GitLab is a popular platform for DevOps that integrates source code management, continuous integration, and continuous deployment (CI/CD) into a single application. One of the powerful features of GitLab is its ability to create and manage pipelines, which automate the process of building, testing, and deploying code. While GitLab provides automated pipelines, there are times when you might want to set up a manual pipeline to give you more control over specific stages of your CI/CD process. This article will guide you through the steps to set up a manual pipeline on GitLab.
What is a Manual Pipeline?
A manual pipeline in GitLab allows you to define stages and jobs that require manual intervention to execute. This can be useful in various scenarios, such as when you need to run certain tests only in specific conditions, deploy to production only after manual approval, or handle complex workflows that require human decision-making.
Setting Up a Manual Pipeline
Step 1: Create a GitLab Repository
Before you can set up a pipeline, you need to have a repository on GitLab. If you don’t have one, you can create it by following these steps:
-
Log in to your GitLab account.
-
Click on the "New Project" button.
-
Fill in the project name and other required details.
-
Click on the "Create project" button.
Step 2: Add a .gitlab-ci.yml File
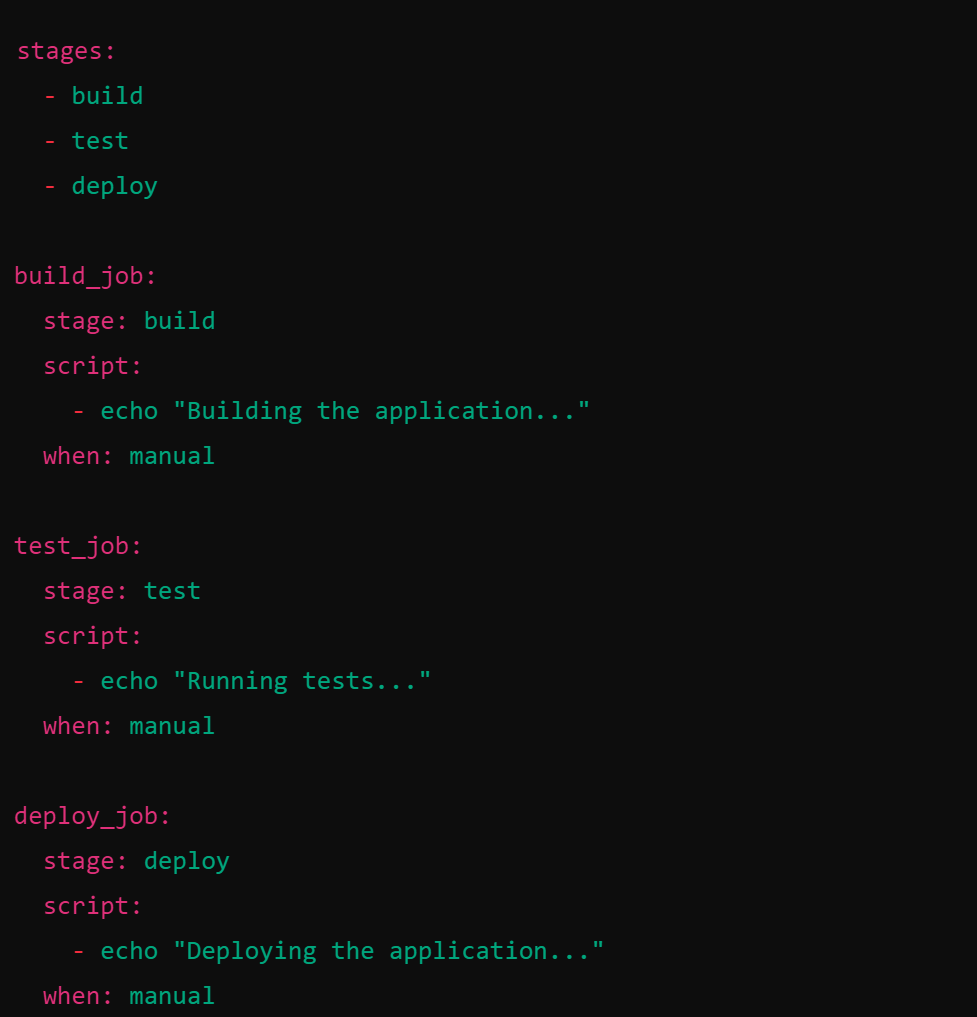
The .gitlab-ci.yml file is where you define your pipeline configuration. To create a manual pipeline, you need to add specific stages and jobs to this file. Here is an example configuration:
Step 3: Configure Jobs
In the example above, three jobs are defined: build_job, test_job, and deploy_job. Each job is assigned to a specific stage (build, test, deploy) and includes a script to execute. The when: manual keyword indicates that these jobs need to be triggered manually.
Step 4: Commit and Push the .gitlab-ci.yml File
Once you have created the .gitlab-ci.yml file with the necessary configuration, commit and push it to your GitLab repository:

Step 5: Trigger the Manual Pipeline
After pushing the configuration file, you can trigger the manual pipeline from the GitLab web interface:
-
Navigate to your project’s CI/CD section by clicking on "CI / CD" in the sidebar and then "Pipelines".
-
You should see a list of pipelines, including the one you just configured.
-
Click on the "Run pipeline" button to start the pipeline manually.
-
You will see your defined stages and jobs. Click on the "Play" button next to each job to execute them manually.
Step 6: Monitor Pipeline Execution
As you manually trigger each job, GitLab provides real-time feedback on the status of the pipeline. You can monitor the progress and view logs for each job to ensure everything is running as expected.
Step 7: Handle Job Dependencies
If you have dependencies between jobs, ensure that the jobs are executed in the correct order. In the example configuration, jobs are organized into stages, which are executed sequentially. Ensure that each job completes successfully before proceeding to the next stage.
Benefits of Manual Pipelines
Manual pipelines provide flexibility and control over the CI/CD process. They are particularly useful for:
-
Conditional Execution: Run specific jobs only under certain conditions.
-
Manual Approvals: Require human intervention before deploying to sensitive environments like production.
-
Complex Workflows: Handle workflows that need human decision-making at various stages.
Conclusion
Setting up a manual pipeline on GitLab gives you greater control over your CI/CD process, enabling you to manage complex workflows and ensure quality at every stage. By following the steps outlined in this article, you can create a manual pipeline that fits your specific needs and integrates seamlessly with your development process. Whether you’re building, testing, or deploying applications, GitLab’s manual pipelines provide the flexibility and control you need to deliver high-quality software efficiently.
Read Also: HOW TO IMPLEMENT VERSION CONTROL WITH GITLAB
Read Also: WHY DEVOPS AND DEVSECOPS NEED GITLAB